
Spatchcock Roasted Chicken
Roasting chicken seems to intimidate a lot of people. And it used to intimidate me before I started making them and realizing how easy and low-maintenance this method was. No babysitting the bird, no basting its juices, and most importantly no trussing carcasses!
If you have a sharp pair of kitchen shears on hand, you can easily spatchcock a chicken and make a delicious, fancy looking dinner in under an hour and half. And often, I place the chicken right on top of the vegetables I'm serving with it for even easier clean up. Everything goes in the oven at once, set a timer, and go finish some homework or a few loads of laundry before it's done. Sheet pan dinners, anyone? Sign me up.
Before culinary school, I started spatchcocking chickens after seeing them pop up all over my Instagram feed. And one of my favorite queens of the culinary world, Martha Stewart, has a fantastic step-by-step method on her site, with photos included (that's where I learned how to do it). Once you learn how to spatchcock a chicken, you can do it to any kind of poultry. I like doing it with turkey on Thanksgiving since it cuts down cooking times practically in half. So go take a look, and then get those kitchen shears ready. And don't forget to keep and freeze the backbone for chicken stock.
Roasted Chicken Sheet Pan Dinner
Cook time: at least 1 hour
Serves: 4
1 whole chicken, 3 to 4 pounds, spatchcocked and flattened
1 large onion, quartered
3 medium carrots, large chunks cut on a bias
3 celery stalks, large chunks cut on a bias
6 garlic cloves, skins left on
1/2 stick unsalted butter, softened
Fresh thyme sprigs
Kosher salt
Black pepper
Granulated garlic
Olive oil
Preheat your oven to 365ºF.
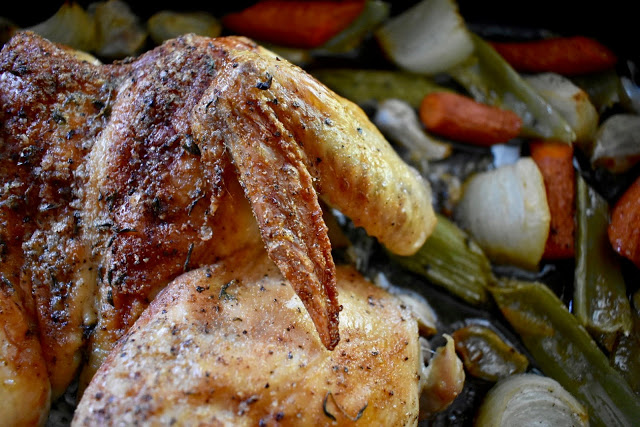
On a whole sheet pan or large roasting pan, add the chopped up vegetables and garlic cloves and toss well with olive oil. Then liberally season with kosher salt and black pepper. Place a few fresh thyme springs in the center of the pan and then place the spatchcocked chicken on top of the fresh thyme and vegetables.
Use your fingers to gently separate the skin from the chicken breast and leg quarters. Make sure to not rip the skin off. This will help seal in moisture while roasting the chicken. Rub the softened butter underneath the skin and on top of the breast and thighs. Spread evenly across the bird and if it's a little chunky, press down a bit to make sure there's an even layer of butter under the skin.
Next, liberally season the chicken with kosher salt, black pepper, granulated garlic and a fresh thyme leaves. And I mean liberally. Go a little crazy. Salt helps the skin get super crispy when you're roasting it because it draws the water out of the skin; so you'll get a perfectly golden and crispy bird each time. Then, get a good drizzle of olive oil all over the bird. I find that doing so in a criss-cross diagonal motion helps get even coverage.

Don't place the chicken into the oven until it's completely preheated. Once you put the chicken in the oven, don't open it until the timer is done. Roast the chicken for 1 1/2 hours or until the juices run clear in the thickest part of the thigh. I don't open the oven until the timer goes off and then I check the internal temperature with a meat thermometer to make sure it's ready. This is key! No peeking! Opening the oven always releases crucial heat buildup, so you're only extending your cooking time by opening the door.
Personally, I take my chicken out at 160ºF and let it rest for at least 10 minutes and take the resting temperature before serving. According to the USDA, poultry is safe to consume at 165ºF, so the heat from carryover cooking will continue to cook the meat without over-drying it.
Serve the roasted chicken and vegetables with your favorite side dish or just enjoy it as is.

Breast portion, roasted vegetables, white rice and stewed Puerto Rican-style beans.
¡Buen provecho!